
Ellie Mae

Ellie Mae
Beautiful Ellie Mae

Freddie, the French Bulldog

Freddie, the French Bulldog
Lazing on a sunny afternoon

The artist

The artist
Ollie Mac

Ollie and Annie

Ollie and Annie
Azorean grandmother

Acrylics and watercolors

Acrylics and watercolors
Cannabis and sunflowers

Papa and Ollie Mac

Papa and Ollie Mac
Priorities, Baby

Acrylics and watercolors

Acrylics and watercolors
Hollyhocks

Mahlon Masling Blue

Mahlon Masling Blue
My friend and brother.

Mark's E-mail address

bellspringsmark@gmail.com

Sunday, June 11, 2023

The ABC's of Cooking: F Is for Fiesta

I plan a meal every week around the theme of a Mexican feast. I serve a main course, a pot of home-cooked pinto beans, Spanish rice and a green salad, with all of the fixings like pico de gallo, hot sauce, salsa and guacamole, if taquitos are involved. 
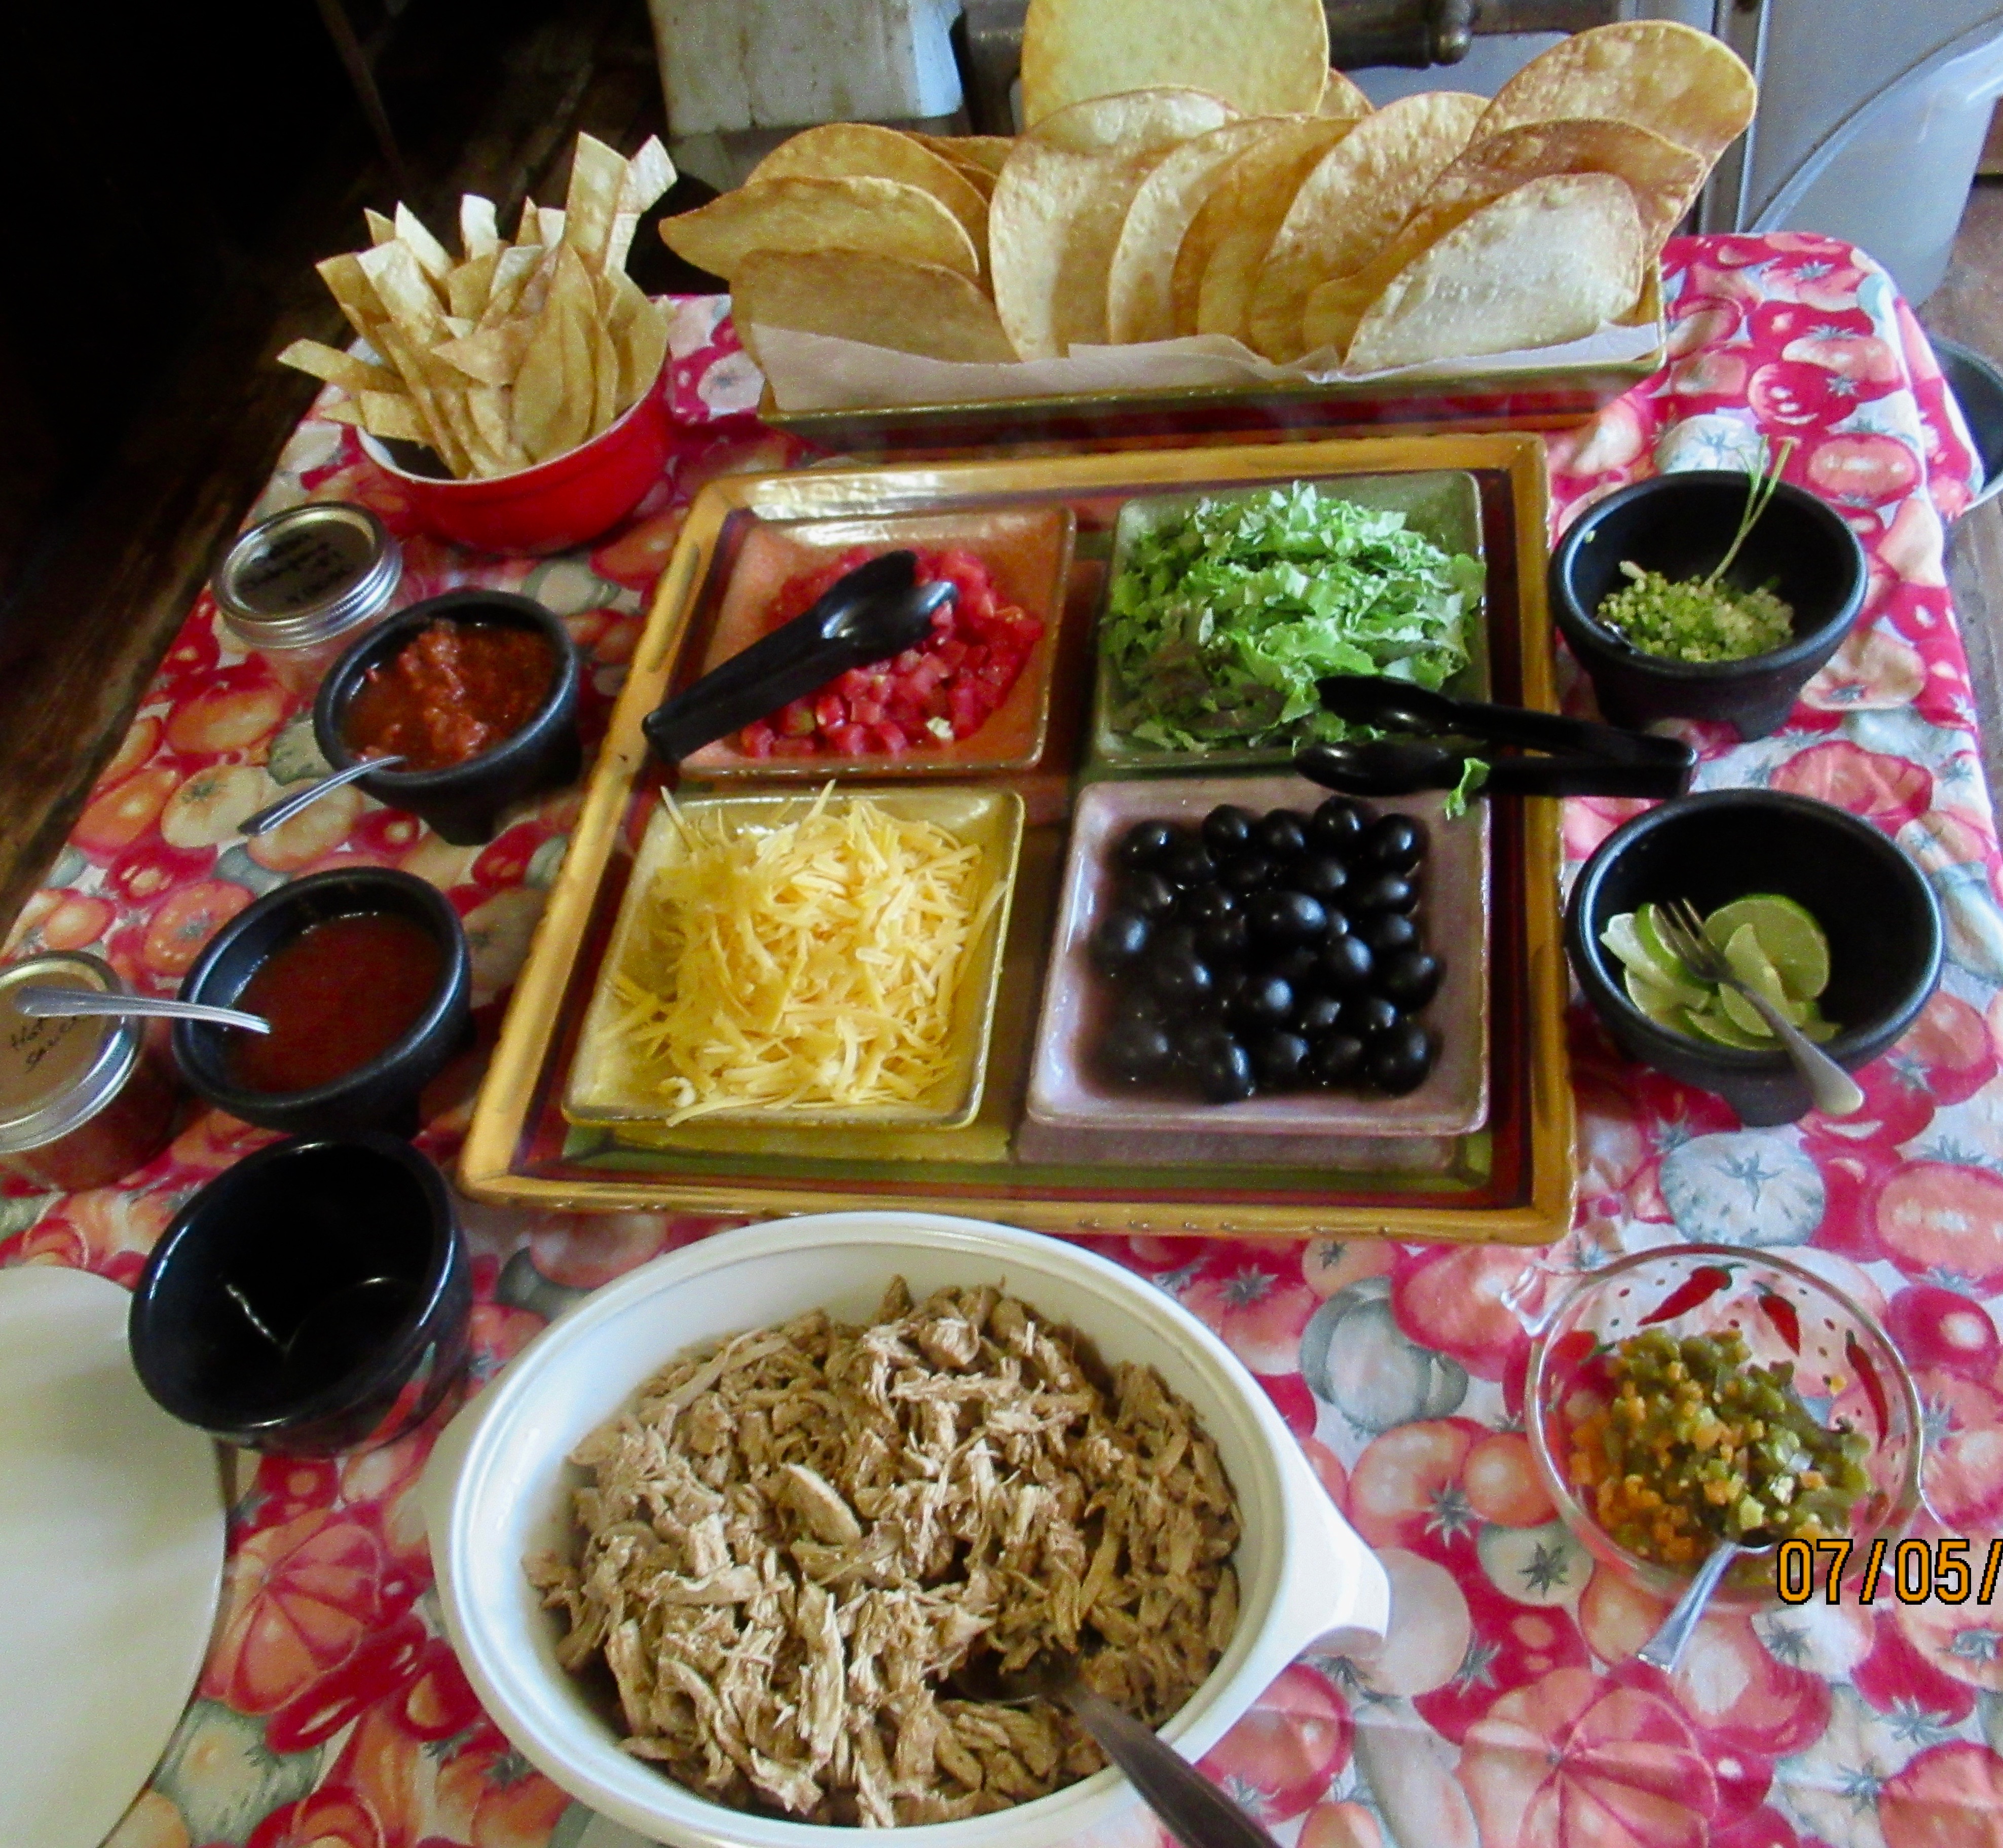
Growing up in SoCal, Mexican food was served in our household beginning in the early sixties, as a result of my father working in a steel factory with a workforce that was ninety percent black or Mexican. Exchanging lunches at different times with friends, led my father to introducing such dishes as soft tacos, burritos and rancho steak to our regular household menu. 


Hey, beans and rice were and are cheap, as were hamburger and chuck steak. The flavors were alive and vibrant and because my father was getting expert advice, we were eating Mexican cuisine long before TacoBell opened its doors.


Of the four components to my Mexican feasts, cooking the Spanish rice is the easiest. I use Basmati brown rice because I was given a fifty-pound sack of it, but any type of rice works just fine. 


Spanish rice


1 1/2 cups of rice

3 cups of liquid (water, broth or tomato sauce, or any combo)

1/4 cup olive oil or avocado oil

1 medium onion

3 or 4 cloves of minced garlic

1 teaspoon cumin

1 reason chili powder

1/2 teaspoon paprika

1 teaspoon salt

1/2 teaspoon black pepper


I rinse my one-and-a-half cups of brown rice thoroughly, running warm water over the rice while it is in a large [fine] strainer, until the water runs clear out the bottom. I heat one-fourth of a cup of olive oil (or avocado oil) and sauté one medium diced onion and several cloves of minced garlic in it until they are cooked. I then add the rinsed rice to the pan and stir it regularly over a low-to-medium fire until it it starts to brown. 
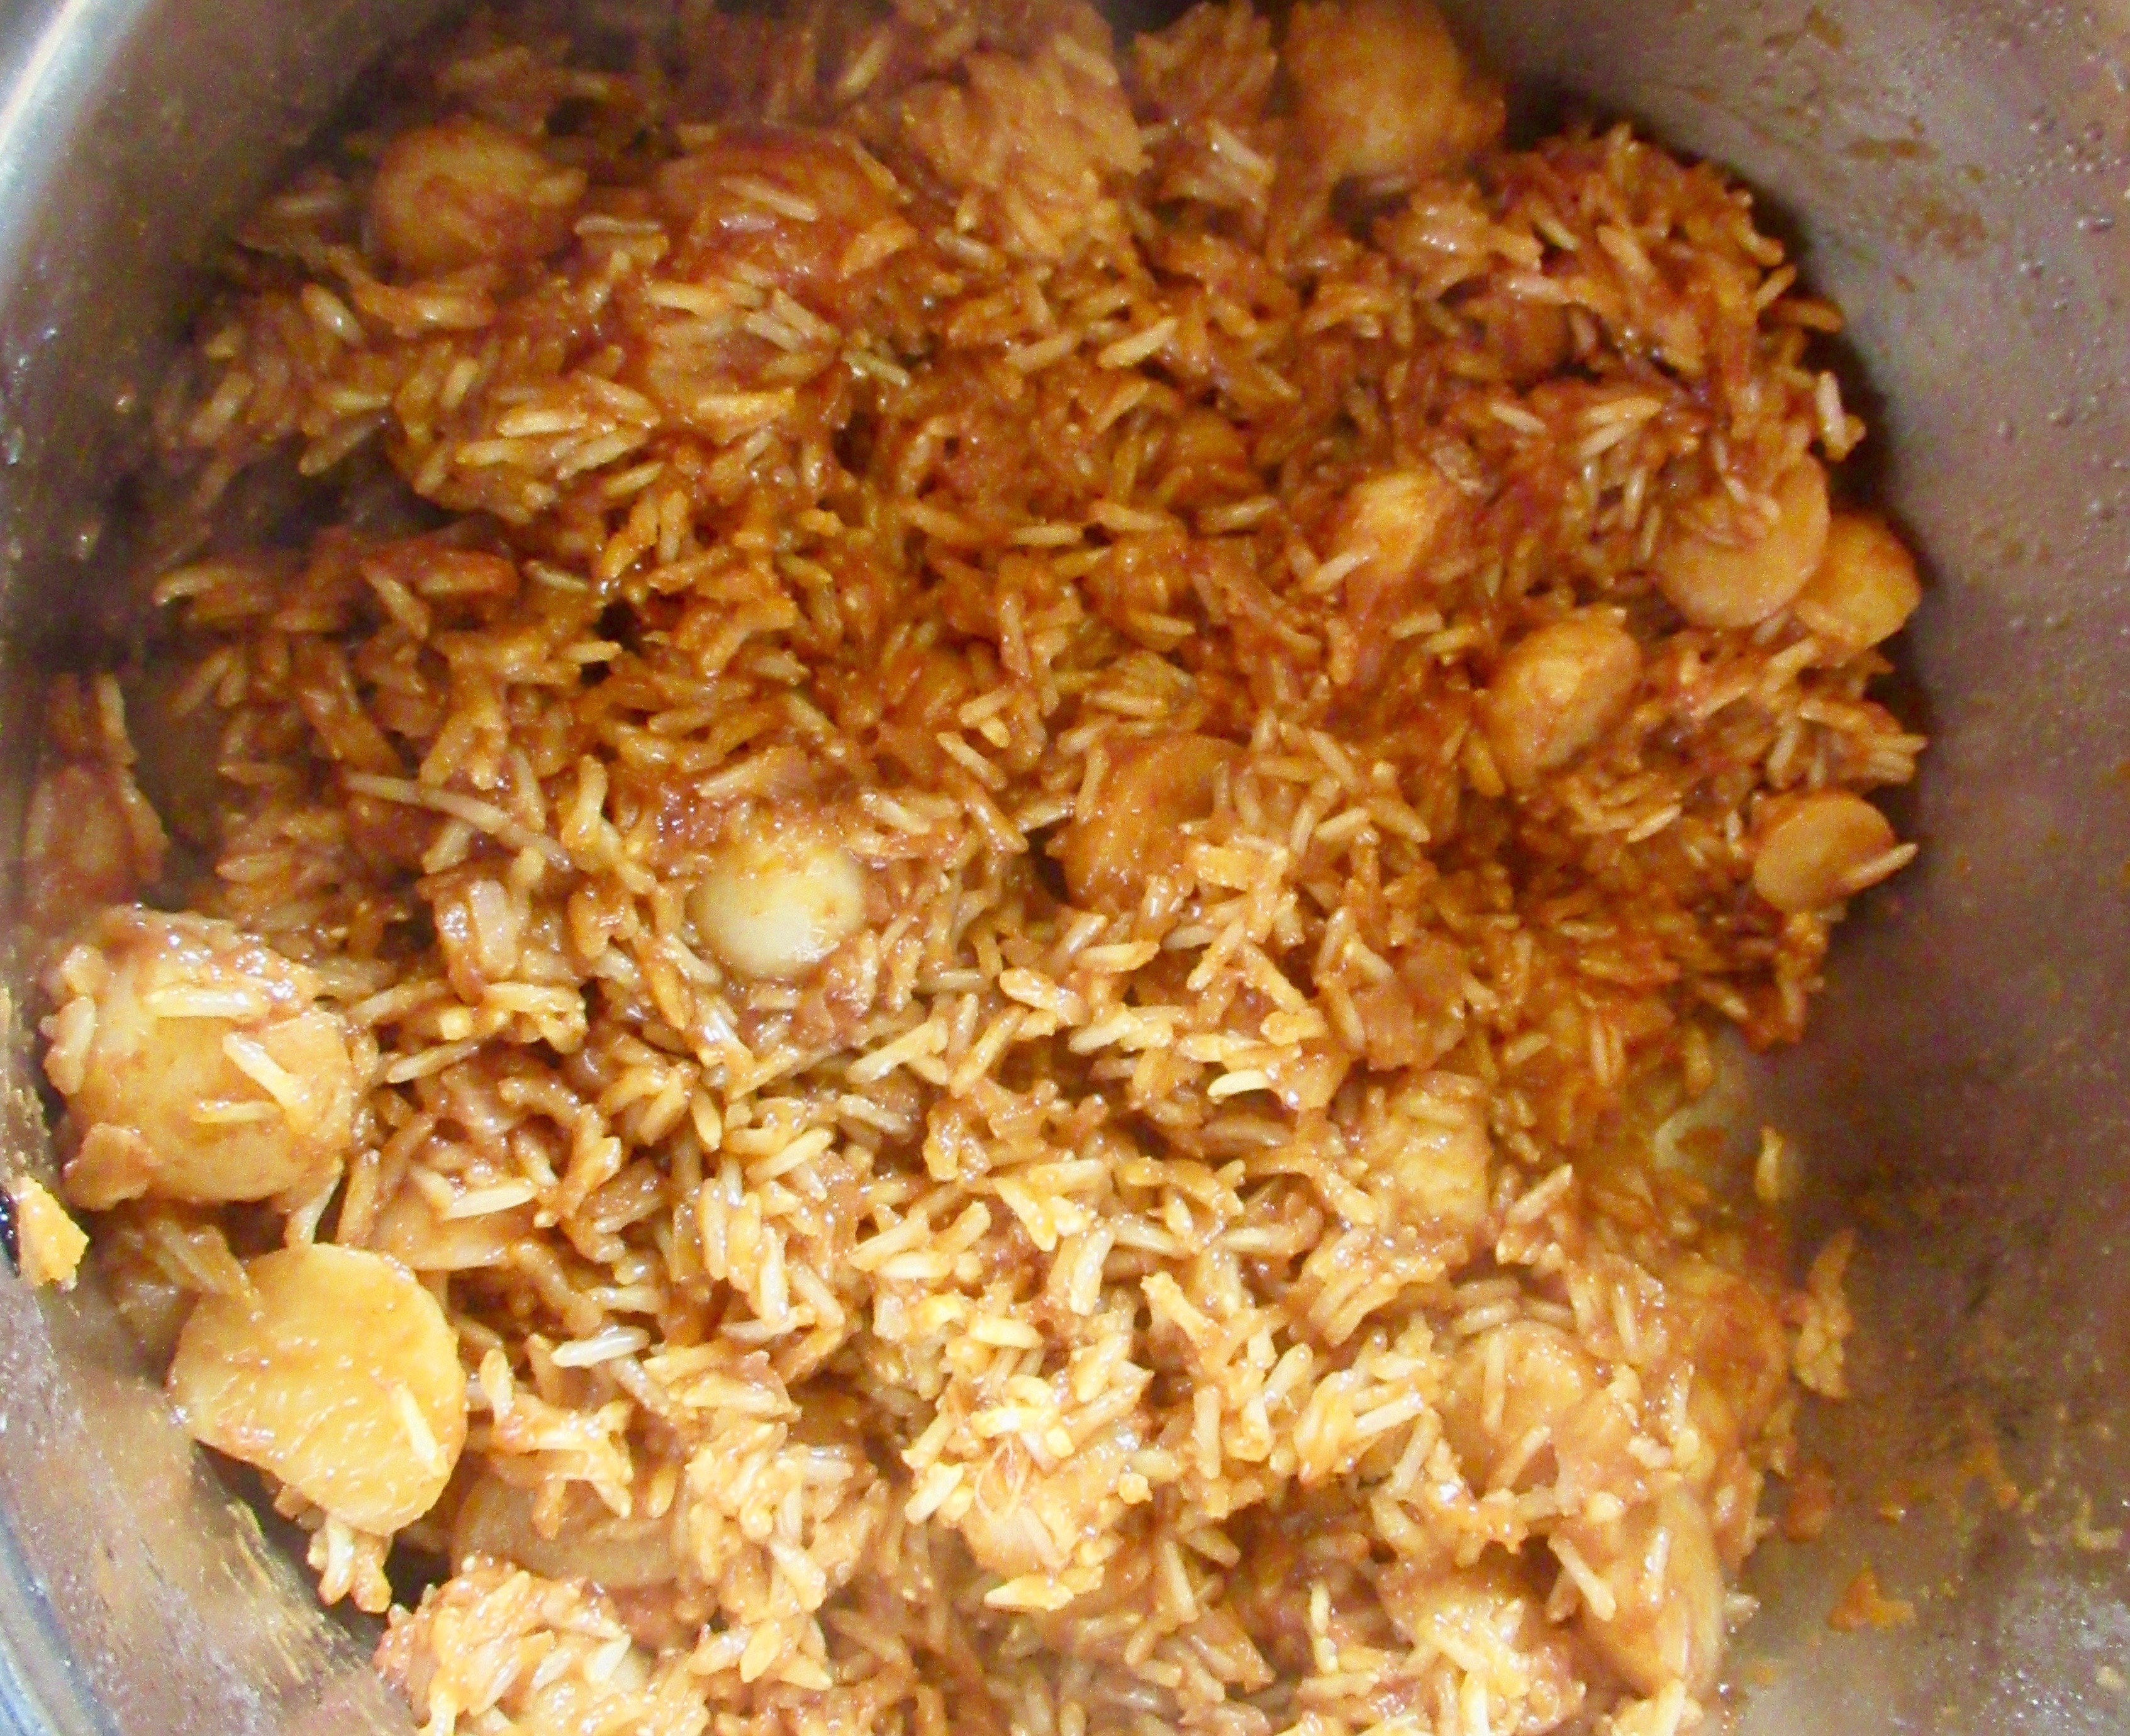

I added baby turnips to this
batch of Spanish rice.
Since the ratio of liquid to rice is two to one, I combine one cup of tomato sauce with two cups of homemade chicken broth and add the liquid to my rice mixture. I stir in one teaspoon of cumin, one teaspoon of chili powder, one-half teaspoon of paprika, one teaspoon of salt, one-half teaspoon of black pepper and after stirring the mixture, cover it with a lid until it boils. I then turn the burner down to a simmer and set the timer for thirty-five minutes. 


When the bell dings, I turn the burner off, wait five minutes and then stir the rice with a serving fork. I cover it again and let it set another ten minutes before it is ready to be served. The additional time just makes sure the rice is fully cooked and therefore, softest. You can cook Spanish rice in the oven but I don’t find I gain enough to justify turning on the oven. You can also use any kind of rice you want and simply follow time requirements accordingly.


Next is a recipe for cooking dried pinto beans, which I buy in bulk from Mariposa Market, in Willits.


Pinto beans, from dried beans


4 cups rinsed pinto beans 

3 or 4 ounces of diced bacon

1cup red wine

2 diced onions (or to taste)

2 diced Bell peppers (or to taste)

4 or 5 cloves of minced garlic (or to taste)

1 quart of canned tomatoes (I use whole tomatoes but diced work fine too.)

3 or 4 sprigs of minced rosemary (substitute one teaspoon of ground if fresh is not available)

3 or 4 sprigs of minced thyme (substitute one teaspoon of ground if fresh is not available)

3 or 4 sprigs of minced sage (substitute one teaspoon of ground if fresh is not available)

1 teaspoon of cumin

1 teaspoon chili powder

1/2 teaspoon of paprika

1 teaspoon of salt to start, then to taste

3/4 teaspoon of black pepper

1 tablespoon vinegar (I prefer red wine vinegar)

1 tablespoon Worcestershire sauce

chicken broth (or water)

!/4-1/2 cup white rice flour (or any kind of flour or thickener)


Dried pinto beans are traditionally soaked for around eight hours prior to cooking them, though one can find directions online for skipping the soaking step. Setting the beans aside once they are drained, I cook the bacon on a low-to-medium burner and then sauté the onions, peppers and garlic in the bacon grease, breaking the glaze with some of the one cup of red wine. Also, some of the chicken broth/water can be used while the vegetables cook. 


I add the prepared spices as I am cooking the veggies and when they are ready (around five minutes), I add the beans and enough chicken broth or fresh water to cover the beans by two inches. The beans will soak up the liquid so if you need to, add more. Two quarts is what I generally figure will work. I add the flour slowly and whisk it so it can't clump. This thickens the broth in which the beans are cooking.


How high you have the burner will determine how long it takes to cook the beans. With a flame to keep them gently boiling, without being in a full rolling boil, I cook the beans for two hours and then taste them. Some folks like their beans cooked so they are super soft; others like them still a bit firm. So just taste-test as you go, or let them simmer for a longer period of time so they can’t make any serious changes quickly.


Because I make a huge Dutch oven of pinto beans, I have lots left over. I take the leftovers and divide them into two tuppies and pop them into the freezer. That way I only have to cook the beans from scratch every third Mexican fiesta.


When I make taquitos, I always time them for when I have ripe avocados. One simply does not contemplate making taquitos if one does not have fresh avocados and preferably cilantro to go along with them for guacamole. This is the recipe I followed a few days ago, when I had eight farm personnel for lunch:


Guacamole


4 avocados, seeds removed and fruit scooped out of their skins

1 good-sized tomato, diced into small bits

I cup of salsa (you determine how spicy the guacamole is)

1 small shallot or onion, minced (or finely chopped scallions) 

1/4 teaspoon salt

1/4 teaspoon black pepper

1 tablespoon red wine vinegar (or vinegar of choice)

1 teaspoon lemon juice

1/4 jalapeño pepper, minced (or to taste)

Minced cilantro to taste


I use a regular hand-held potato masher to smash and mix the avocados together, switching to a wooden spoon as soon as the avocado is the consistency I most like. I then add the tomato, salsa, onion/shallot/scallions, salt/pepper, vinegar, lemon juice, cilantro and jalapeño pepper, and mix them until everything has had a chance to blend together. It is ready to serve.


Taco seasoning


1/2 cup of chili powder

1/4 cup onion powder

2 tablespoons cumin

2 tablespoons garlic powder

1 tablespoon smoked paprika

2 tablespoons sea salt

1 tablespoon black pepper


Taco seasoning is essential for my kitchen for three reasons: It saves time because all of these spices are already assembled in one container; I buy these organic spices in bulk; finally, I use them frequently so it just makes sense. You have to decide what works best for you. 


I add one-quarter cup of taco seasoning to two pounds of ground beef or ground turkey, and then add three-quarters of a cup of chicken broth or water and mix it in with the taco seasoning. I let it simmer until the water has evaporated or been soaked into the ground meat. I also add taco seasoning to shedded beef or chicken or slow-cooked lamb, pork or beef for use in any of a number of dishes.


I use corn tortillas for soft tacos and I bake them for tostadas. Technically, tostadas do not have meat-only beans, cheese, tomatoes, salsa/hot sauce and whatever else you want to put on. Here on-farm, I make tostadas using ground beef, turkey, lamb or chorizo, or any combination. I also make tostadas using shredded beef, chicken, or lamb, so any given meal only pops up on the menu every few months. Here is a recipe for baking corn tortillas.


Oven-roasted corn tortillas, for tostadas


Preheat the oven to 350 degrees. (Some recipes call for higher oven temperatures, but then you have to be right on top of matters at all times to prevent the tortillas from burning. I prefer a gentler pace.)


Spread tortillas out on one or more cookie sheets and then coat them lightly on both sides with avocado oil. If you want to sprinkle salt on, this is the best time. Put them in the oven and check after seven or eight minutes. Flip them over and bake for another five-to-seven minutes before checking them regularly to remove them when they are all the way cooked. Some folks like them super crunchy and leave them in the oven a bit longer. Remove when done and let them cool on racks. They are ready to serve as soon as they are cool enough to be handled.


Another dish I use corn tortillas for is taquitos. The filling can be ground or shredded meat, flavored with taco seasoning. You can either bake taquitos or cook them in oil, and you serve them with guacamole. One key to successful taquitos is to use a griddle or skillet that has been heating up for at least ten minutes to warm up the tortillas. If the griddle is not hot enough, then the tortillas will not heat enough and will split open when you try to roll them up. They will taste fine but will not look as appealing. 


I place the tortilla on the griddle, wait about ten or twelve seconds, and then flip it over for another six or eight seconds. You can flip tortillas with your bare fingers if you like, which is what I would do when heating up a couple for my own lunch, but if I am doing a couple dozen, give me a big, flat metal spatula and let me flip them the easy way. If you leave them on the griddle too long, they will harden and make it impossible to roll them up successfully. 


If you put too much meat into the tortillas, they will not roll properly and will come apart, so start small (one tablespoon) and add more on your way up to bigger taquitos. 


I put enough avocado oil in my skillet, so that when I put five taquitos into the skillet, the oil is about halfway up the sides of the taquitos. They should sizzle as I put them into the oil. I cook them on a medium fire for two minutes on each side, monitoring them to make sure they are not cooking too fast. I can always heat them up prior to serving, but not so much if they are already overcooked.


When first putting the taquitos into the oil, using tongs I place the fold of the taquito down into the oil, so that when I flip the taquitos over, the fold has already cooked and hardened, and the taquitos can’t flop open. It takes a minute or two and a few trials to figure out where the tongs have to be when you let go of the taquito. And resist the urge to help with your free hand-that oil is not fooling around. 


One final note is that different brands of tortillas can vary in both diameter and thickness. It’s not good or bad, but different times come into play, as far as both heating the tortillas up and as for cooking them. Do a taste-test as necessary as you get used to cooking them.


As for the feast, the green salad can be prepared in advance and the beans and the rice do well in cruise mode after they are done, as neither must be served piping hot. Whether you are serving tacos, burritos, tostadas, enchiladas, rancho steak, fajitas, chili verde or any other form of Hispanic cuisine, rice, beans and a green salad are the perfect combo.


Friday, May 26, 2023

The ABC's of Cooking: E Is for Eggs

Every head chef of every family needs as many go-to recipes that are quick and easy as possible, without sacrificing nutrition and flavor. At the top of my list I place eggs because HappyDayFarms has chickens and they are in full stride, providing eggs for both family and the farm stand. Even though the cost of eggs has gone up, all I can say is that eggs still stack up favorably as far as quick meals go. What eggs lose in terms of cost, they gain as far as ease of preparation.


Because I receive vast amounts of veggies each week from Casey, especially cooking greens to use for lunches, I am always trying to think of new ways to prepare them. If you are one who also gets beet tops, turnip greens, boy choy, spinach, kale, chard, cabbage or any other kind of cooking greens, and you sometimes feel at a loss as to how to use them, think about an egg stir.


Kid friendly? That depends on whether the kids have been raised on veggies from the garden/farmers’ market or McDonald’s and chili-mac. In any case, (no judgment) if the kids are traveling down a different culinary avenue, the adults still have to eat.


Almost identical to a frittata in terms of how an egg stir is prepared, one difference is that instead of eggs being the dominant ingredient, cooking greens are. The other difference is that a frittata is usually baked in the oven and an egg stir is cooked on top of the stove. I simply sauté the chopped greens in a skillet in farm-produced lard or olive oil until they are cooked (The time will vary for different greens), and then pour whisked eggs over the veggies, and cook them as I would scrambled eggs. 


In cooking eggs in this manner, I use a medium fire and stay attentive to the cooking eggs, because it only takes three-four minutes with a medium fire. I stir/flip them every thirty seconds or so to prevent the eggs from burning. With the liquid from the cooking greens, it is almost impossible to burn the eggs.


Once the eggs have cooked, I can turn off the burner, add cheese, put a lid on the skillet to allow the cheese to melt, and then serve. 


When I was teaching, I perfected cooking the seven-minute breakfast for myself, using a can of already cut-up potatoes, two or three eggs, grated cheese, salt/pepper and tortillas. Getting out a medium-sized skillet with lid, I opened up the can of potatoes, drained them and put them into the skillet over a medium fire, with enough oil to barely cove the bottom of the pan. At the same time I put the griddle on a different burner, to get it heated up for warming tortillas. 


I whisked the eggs together and as soon as the potatoes were hot, I poured the eggs over them and stayed on top of them so the eggs didn’t burn. I grated enough cheese to cover the eggs and potatoes, and when the eggs had cooked, I turned off the burner, put the cheese on, covered it with a lid and waited long enough to melt the cheese. I then filled heated tortillas with the mixture and added hot sauce or salsa as desired. 


Egg stirs can contain any variety of different ingredients, from veggies to macaroni and cheese, zucchini casserole, sausages, leftover chopped up enchiladas, chunks of rancho steak, chili con carne and whatever other leftovers you have in the icebox.


No discussion about eggs would be complete without a recipe for deviled eggs. I usually cook a dozen hard-boiled eggs to make two dozen servings for a gathering. If you have a special trick for peeling [fresh] hard-boiled eggs, then trot that baby out and dust it off.


Otherwise, place the eggs in a large saucepan in a single layer and cover them with at least two inches of water. Bring the water to a boil over a medium fire, reduce the heat and cook for twelve minutes. Take the eggs off the stove and run cold water over them until you can handle an egg under running water. I take the flat side of a knife and tap it firmly over every centimeter of the egg, breaking the shell into a spider web of tiny pieces. I then roll the egg on a wooden cutting board until small pieces of shell start to fall off.


Under running water I then find that the shell peels off pretty efficiently. And yes, there will almost always be a weisenheimer in there that will end up being your taste test.


By running the water over the eggs as I peel them, they naturally cool off, allowing me to cut them in half, lengthwise. I put the half-yokes in a separate dish, mash them up and add one-half cup of mayonnaise, two teaspoons of vinegar, two teaspoons of yellow mustard, black pepper to taste and smoked paprika as a garnish. 


I do not add salt as this is one dish where a little goes way too far. After mixing the yokes and the rest of the ingredients, I then spoon the mixture back into the empty half eggs and add the paprika, before chilling the deviled eggs for serving.


Growing up, the boys loved a breakfast of hash browns and chili omelet, with the omelet being formed by simply spreading a can of heated chili across six or eight already-scrambled eggs, with cheese on the top. It takes ten minutes to make a chili omelet.


Fried, easy-over, scrambled, poached or mixed with just about anything, eggs are one way to go.


Tuesday, May 16, 2023

The ABC's of Cooking: D Is for Dutch Oven

What is the difference between a Dutch oven and a big saucepan? About twenty pounds. My ten-quart Dutch weighs in at 28.4 pounds, empty. The two tabs which stick out on either side and accommodate the heavy wire handle, allow me to lug it around using both hands. When filled, it is an armload.


The weight of the Dutch oven is the reason why it is so effective of a tool. The cast iron pot absorbs the heat from the burner (or oven) and releases it back into whatever is heating up inside. The difference between cooking French fries in hot oil in a Dutch oven and cooking them in a conventional saucepan, is too much to ignore. I mean, if you like crispy fries.


I have three Dutch ovens and use the biggest one most consistently for everything from a hearty lamb stew to stovetop fried chicken. In summertime I use it exclusively on top of the stove; in winter it can go into the oven, if I want to get some heat infused into a cold kitchen.


Slow-cooking a big cross-cut rib roast or a leg of lamb, is tailor-made for a Dutch oven. After having put salt and black pepper on the roast, I will heat up a quarter-cup of olive oil over a medium fire and sear the roast on each side for three-four minutes, with the lid on. When that is done, I break the glaze with red wine before adding onions, garlic and water/broth and cooking it for several hours, depending on what I am going to eventually use it for. 


I will often shred the meat for taquitos, tacos or tostadas or else I will cut it into bite-size chunks for adding to any number of dishes I might be preparing. Slow-cooking the roast in advance merely gives me flexibility and thus, an advantage. With the meat already cooked and cut up, I can add it as early or late to a dish as I please, without having to prepare it from scratch. 


Stews, chili, pinto beans, chili chicken, French fries, stove-top fried chicken, slow-roasting any cut of meat, frying fish, stove-top mac and cheese, chicken strips, chili verde and soups are among the dishes for which I use a Dutch oven.


The Dutch oven is also great on camping trips because of how well it absorbs heat. It serves as a one-pot-cooks-all for either a Coleman stove or a fire pit. As for cleaning it afterwards, if you coat the outside of the pot with dish soap before you ever use it, you can clean the inside after you use it and then put it in a plastic bag until you get home, where you can wash it in the sink with a lot less hassle than on the camping trip. The soot comes right off because of the dish soap.


Among my Dutch ovens is a Lodge cooking wok that is also cast iron, which I use to cook up my side dishes of veggies for farm lunches. I always start with three or four ounces of chopped bacon, add a couple of diced shallots, a quarter-cup of balsamic vinegar and a splash of maple syrup, before I fill the wok with kale, chard, beet tops, cabbage or anything else Casey has brought to me to cook from the farm. I add chicken broth to provide plenty of liquid, I lightly salt it and liberally add black pepper and cook it for around fifteen minutes with the lid on, depending on what is in the wok, for an easy and delicious side dish. I taste-test as I go.


Unlike a Dutch uncle, who will give you all sorts of advice but doesn’t really do anything, a Dutch oven gits ‘er done.


Rancho Steak (My father started cooking this dish in the sixties, after his coworkers at the steel factory let him sample their lunches. Almost all of his coworkers were either Mexican or black. In our household we were taught that it was not the color of a man’s skin that counted, but what was inside that skin.)


3 lbs. cut-up stew meat

1/2 cup gluten-free flour (I use white rice flour) or any kind of all-purpose flour

1/4 cup olive oil

1 cup red wine

salt/black pepper to taste (I start with a teaspoon of salt and a half-teaspoon of black pepper)

4 ounces of chopped bacon

2 onions or several shallots (I used leeks recently because I had them!)

4 or 5 cloves of fresh garlic 

2 Bell peppers

1 quart whole cooked tomatoes

1 pint tomato sauce

12 ounces cut up mushrooms

2 large carrots, cut up

3 large stalks of celery, finely diced 

I tablespoon red wine vinegar

1 tablespoon cumin

1 tablespoon red chili pepper (mild)

1 teaspoon paprika

2 bay leaves

1 quart of beef broth, though I use chicken broth because that is what I always have on hand. Any kind of broth works. So does water.


Optional: one whole jalapeño pepper, minced or any part of one to add a little spice to the dish. 


I whisk the flour, salt and pepper together before stirring it into the meat so that it covers it entirely. I heat up the Dutch oven on a medium fire on top of the stove, add the olive oil and brown the meat, usually about ten minutes, stirring it several times to keep it from sticking or burning. Once it is done, I break the glaze with part of the red wine, turn off the fire and remove the meat from the Dutch oven. I set it aside for the time being.


I use the Dutch oven just as it is, after removing the meat, and cook the bacon until it is almost all the way done, before adding the diced onions, Bell peppers, garlic, celery, carrots and mushrooms, using the water from the whole tomatoes to keep the veggies cooking without having them stick. I can also add any amount of the broth for the same reason.


After the veggies have had time to soften up, I add the rest of the broth, tomatoes, wine, spices, tomato sauce and the browned meat, and bring the mixture to a boil. I turn down the heat so it is more than a simmer, but not hot enough to require constant stirring and let it cook for two hours, to allow the meat to become tender. 


I always figure I need three hours to cook this dish, or it can be cooked at any point in time earlier, and heated up for the meal. I serve it over rice, but pasta or mashed potatoes work great also.